ARTICLES
These Are Some Of My Articles Regarding Different Topics Hope You All Enjoy..Many More Are Coming Soon.....
1) What Is The Difference Between Blogging & Vlogging ???

Every brand or individual wants to get more visitors to their blog. There are basically two traffic generation strategies blogging and vlogging to generate huge amount of traffic and gain potential customers.
Blogging is all about writing articles and vlogging is all about creating videos.
But the question is what to choose? Blogging or vlogging?
HERE IS THE ANSWER
BloggingBlogging is like an online log, where an author can share his thoughts, experience or whatever he wants to share with his readers about any specific topic.
Advantages of Blogging1. Easy to set upIt’s very easy to set up a blog. You don’t need extended technical knowledge to create a blog. There are several platforms like WordPress, blogger, Thumblr… making our life simpler for creating a blog.
2. Does not require massive equipmentTo create a blog, you need not to have a lot of equipment. All you need to have is A computer and a good internet connection.
Get huge traffic to your site, by using SEO and proper promotion of your content on social networking sites, blog directories … and earn decent amount of money by using Adsence ads, affiliated marketing…
Disadvantages of Blogging1. Need to know about SEOSEO is all about ranking a site in search engines. To generate traffic to your blog, you should have good knowledge about SEO. Learn On page SEO and Off page SEO and implement them.
2. Update your blog regularlyAnother thing you must notice here is, you need to update your blog on regular basis. Convert your visitors to regular blog readers by providing them quality stuff that they are searching for via your articles.
VloggingVlogging stands for video blogging in which one can share his thoughts or whatever he wants to share with others by creating videos.
Advantages of Vlogging1. Doesn’t require professional writing skillsUnlike blog, you don’t need professional writing skills to create a vlog. If you can create quality videos, you will get huge visits with minimal SEO effort and earn money from your videos.
2. You can get more user engagementGenerally people used to watch videos rather than seeing of written stuff. So by creating good vlogs you can get more traffic and more user engagement.
Disadvantages of Vlogging1. Need expensive equipmentTo create a vlog, you need to spend some amount of money for equipment. You need to have a camera to shoot high-quality video and a professional video editor software like adobe after effects.
2. Difficult to edit after submissionWe can easily edit blog post after publishing but when it comes to vlogging editing is not an easy job. If you find any mistake in your uploaded video, you need to delete it and edit the original one and again upload the video in your channel. Sometimes editing is difficult, so you may have to re-record the video.
3. It takes time to vlogIt takes time to record a video, edit the video and upload the video. You require 2-4 hours for a video. So you must spend some amount of time to create vlog and to become a good vlogger.
Blogging or vlogging? It’s up to youIts depends on your opinion whether to choose blogging or vlogging? If you have good writing skills then go for creating a blog and share your knowledge through your blog articles. If you have good speaking skillsthen go for Vlogging.
You can also create a vlog in parallel to blog. Just create a blog and embed video into your articles so that you can get more traffic, more user engagement, and more earnings$$$.
Blogging is all about writing articles and vlogging is all about creating videos.
But the question is what to choose? Blogging or vlogging?
HERE IS THE ANSWER
BloggingBlogging is like an online log, where an author can share his thoughts, experience or whatever he wants to share with his readers about any specific topic.
Advantages of Blogging1. Easy to set upIt’s very easy to set up a blog. You don’t need extended technical knowledge to create a blog. There are several platforms like WordPress, blogger, Thumblr… making our life simpler for creating a blog.
2. Does not require massive equipmentTo create a blog, you need not to have a lot of equipment. All you need to have is A computer and a good internet connection.
Get huge traffic to your site, by using SEO and proper promotion of your content on social networking sites, blog directories … and earn decent amount of money by using Adsence ads, affiliated marketing…
Disadvantages of Blogging1. Need to know about SEOSEO is all about ranking a site in search engines. To generate traffic to your blog, you should have good knowledge about SEO. Learn On page SEO and Off page SEO and implement them.
- Use proper title for your blog posts.
- Use High frequency and low competition Keywords in your articles.
- Use images in your blog posts and try to have at least one image for every blog post.
2. Update your blog regularlyAnother thing you must notice here is, you need to update your blog on regular basis. Convert your visitors to regular blog readers by providing them quality stuff that they are searching for via your articles.
VloggingVlogging stands for video blogging in which one can share his thoughts or whatever he wants to share with others by creating videos.
Advantages of Vlogging1. Doesn’t require professional writing skillsUnlike blog, you don’t need professional writing skills to create a vlog. If you can create quality videos, you will get huge visits with minimal SEO effort and earn money from your videos.
2. You can get more user engagementGenerally people used to watch videos rather than seeing of written stuff. So by creating good vlogs you can get more traffic and more user engagement.
Disadvantages of Vlogging1. Need expensive equipmentTo create a vlog, you need to spend some amount of money for equipment. You need to have a camera to shoot high-quality video and a professional video editor software like adobe after effects.
2. Difficult to edit after submissionWe can easily edit blog post after publishing but when it comes to vlogging editing is not an easy job. If you find any mistake in your uploaded video, you need to delete it and edit the original one and again upload the video in your channel. Sometimes editing is difficult, so you may have to re-record the video.
3. It takes time to vlogIt takes time to record a video, edit the video and upload the video. You require 2-4 hours for a video. So you must spend some amount of time to create vlog and to become a good vlogger.
Blogging or vlogging? It’s up to youIts depends on your opinion whether to choose blogging or vlogging? If you have good writing skills then go for creating a blog and share your knowledge through your blog articles. If you have good speaking skillsthen go for Vlogging.
You can also create a vlog in parallel to blog. Just create a blog and embed video into your articles so that you can get more traffic, more user engagement, and more earnings$$$.
2) What Is SEO? Points To Be Noted For Higher Rankings

SEO is the art of developing a site to rank well in search results. SEO is for getting organic traffic to our site from search engines. In this article, I’m writing about Search Engine Optimization and Basic SEO tips for beginners. So if you have enough knowledge about SEO then I suggest you to skip this article. Well! Let us see about SEO in detail.What is SEO?SEO is the process of developing our site to appear at the top of search results. When users search for something in search engines like Google,yahoo , Bing etc., then these search engines will search for the webpages, videos and other stuff which are relevant to the search query and place them on search results.
HERE IS THE ANSWER
HERE IS THE ANSWER
Generally High page ranked sites will get placed at the top of search results. But if you follow SEO tips properly, you can also get good traffic from search engines.
SEO is of Two types. They are 1.On page SEO 2. Off page SEO
1.On page SEO
On page SEO includes all the tips that you need to follow while writing your articles such as providing quality content, appropriate title, keyword research, keyword placement, adding proper images etc.,2.Off page SEO
Off page SEO deals with the promotion of your content, getting back links. It’s all about link building and increasing link popularity by submitting your site to search engines and trusted directories.
Top 5 SEO tips to get Higher rankingsAs there are lots of SEO tips available, I’m listing Top 5 best SEO tipswhich works great to increase blog traffic from search engines and to improve rankings.1. Quality contentAlways try to provide quality content in your blog. If you write quality posts then people will like your articles and share them so that that you can increase your blog traffic. On the other hand, if you copy stuff from other sources than people may get the wrong impression on you and will effect your blog traffic in a bad way. So try to provide genuine content in your blog articles.2. Social MediaSocial media is the best source to increase blog traffic. As you are beginner, you cannot get huge traffic in over night. So all you need to do is to get traffic from social media.
Just follow these simple steps to increase blog traffic from social media.
Read: Top 10 best websites to increase blog traffic1.Create a Facebook Fan page for your blog and try to promote your articles over there.
2. Join Facebook groups related to your niche and promote your articles.
3. Try to get more traffic from Google + because Google plus has more impact on site ranking. Join Google plus communities, share your content and try interact with other bloggers.
3. Use Twitter , linkedin, Pinterest, Reddit to increase your traffic.
4.Stumbleupon : In my view StumbleUpon is the Best social networking site to increase your blog traffic.
3. Link BuildingLink Building is the process of getting back links to your site from other sites. To get quality back links to your site write Guest posts for trusted and high page ranked sites and ask them for a Do Follow back link. Search engine bots follow these Do Follow back links so you can get more traffic to your site. Also Commenting on CommentLuv blogs will helps you to get traffic.4. Responsive TemplateUse responsive and well SEO optimized template for your blog.Responsive template makes your users comfortable while reading and is an extra benefit for your success in blogging. So use good looking responsive template for your blog and try to have less loading time for your blog by removing unwanted widgets. Have a look at GENESIS WordPress Themes5. Image OptimizationUse proper images for your blog articles and try to have at least one image for every blog post. After adding image to your post, just click on properties and give Title text and Alt text. Search engine bots will read this Alt text from your article so use image optimization for better results.
These are Top 5 best SEO tips for newbies to increase blog traffic. As you are beginner, you need to get good traffic to your site. Just use above SEO tips for better results. If you like my article, then feel free to share it with others. I’ll post more SEO Tips and Tricks in my future articles.
3) Get .COM Domain For Just RS 99/- Only Through GoDaddy.Com

|
Every blogger wants to add a custom domain to his blog. Adding custom domain will give a professional look to your blog. For a custom domain, you need to pay some amount of money. Generally a .COM domain costs you around 630 rupees ($10) per year. New bloggers will not like to pay such amount of money for a domain which they may think as big amount. However, there is a way to get a domain at very low price. In this article, I’ll show you How to get a .COM at INR 99 per year on Godaddy.
What is GoDaddy.com?GoDaddy is the place where you can buy a domain and web hosting for a site. GoDaddy offers many discounts for its customers and you can get a domain or hosting at very low prices here. Well ! Let us see How to get .com domain at ₹99 per year. |
HERE IS THE ANSWER
Get a .com domain from GoDaddy At INR 99 per yearFollow these simple steps to buy your domain from GoDaddy.
Here I’ve used the following domain (techtricksforyou.com) for Demo purpose and I didn’t buy it. If you want you can buy this domain.
Here I’ve used the following domain (techtricksforyou.com) for Demo purpose and I didn’t buy it. If you want you can buy this domain.
- First visit GoDaddy website using this link. There you’ll see a search box same as below. Now type your custom domain in the search box and check whether it is available.

- If the domain is available, SELECT it and click on CONTINUE TO CARTbutton.

- Next a new page appears same as below image. Simply click onContinue to Cart option.

Add This Godaddy Promo Code: cjc149s1
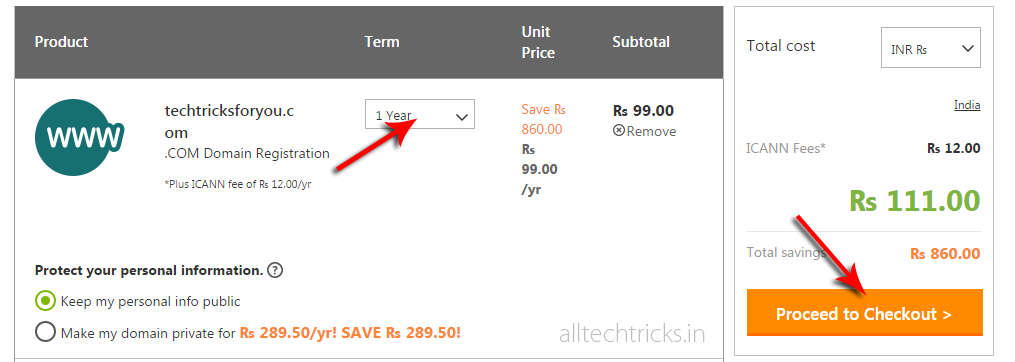
- Here you can see the Term for your domain i.e. 1 year along with Unit Price i.e. ₨ 99.00 /yr. GoDaddy charges RS.12 processing fee and your Total cost is RS 111.00. Click on Proceed to Checkout.
- If you are a Returning Customer, then log in to your account otherwise sign up for an account by clicking on Continue button and complete the purchase. You can pay using a Credit card /Debit card/Net banking.

I hope you have understood How to get a .com domain at 99 rupees on GoDaddy. If you like this article, then share it your friends. If your friends want a domain at RS.99 per year then send the following link to them.
4) The Softwares That Mostly Used By The People By Category Wise
Office Suite
Security
Desktop management
Browser
Fun and Games
Graphics Editing
Video and Audio
PDF creator
Virtual Server
Instant Messaging
Download manager
File Management
Torrent Manager
Backup Program
File Compression
System Optimization and Diagnostic Tool
Email Client
Photo Organizer
Video Converter
FTP client
EyeCandy
- OpenOffice.org – OpenOffice.org is a viable alternative to Microsoft Office – even for professional use. It can do just about anything Office can.
- AbiWord – A lightweight version of Microsoft Office. Simple, straightforward interface; easy to use.
- Jarte – A word processor based on the Microsoft WordPad. It can be run directly from a USB flash drive.
- Notepad++ – A free source code editor and Notepad replacement, which supports several programming languages, running under the MS Windows environment.
- EditPad Lite – A general-purpose text editor, designed to be small and compact, yet offer all the functionality you expect from a basic text editor.
- avast! 4 Home Edition – A complete antivirus solution that is able to find computer viruses, create and check the integrity of programs installed, test executed programs and opened documents, to test and check email and other functions.
- AVG Anti-Virus – A free security solution that is easy to use, has low system resources, automatic update functionality and ability to protect as files are opened and programs are run.
- Comodo Firewall – A free firewall that constantly monitors and defends your PC from internet attacks. It is a fully functional product that comes with continual updates that are free forever!
- McAfee SiteAdvisor – A plugin for Firefox and IE browser that shows safety rating as you browse the Web.
- SpyCatcher Express – A free anti-spyware program that allows novice PC users to remove aggressive spyware, stops next-generation, mutating spyware, blocks reinstallation of aggressive spyware and removes spyware safely and automatically.
- StartupMonitor – A small monitoring program that keeps a constant eye on your system’s startup entries. When ever a change is made, you will be notified and given a choice to either allow the change or not to change.
- SuperStorm Freeware – This software allows you to hide your confidential files and folders in a wide variety of media files such as pictures, audio, video, executable programs among many other file types.
- Windows Defender – A free program that helps protect your computer against pop-ups, slow performance, and security threats caused by spyware and other unwanted software.
- HijackThis – A malware remove tool that makes a detailed log of what’s going on in your Registry and gives you the opportunity to remove things that might be suspect.
- Zone Alarm – This software lets you block uninitiated and unwanted traffic, even while your PC is unattended or while you’re not using your connection.
- Google desktop – A desktop search application that gives you easy access to information on your computer and from the web.
- Yahoo Desktop – Yahoo Desktop enables you to search and instantly find information, preview it in its native format, and take action on it immediately.
- TweakUI – This software reduces the Windows annoyance without having to meddle with the registry. It gives you access to system settings that are not exposed in the Windows XP default user interface, includingmouse settings, Explorer settings, taskbar settings, and more.
- Pretty run – A small program that can search your start menu, desktop or any other folder for shortcuts.
- RoboForm – RoboForm memorizes and securely stores each user name and password the first time you log into a site, then automatically supplies them when you return.
- AutoHotkey – This open-source utility can automate almost anything by sending keystrokes and mouseclicks. You can write macros by hand or use the macro recorder. You can also create hotkeys for keyboard,mouse, joystick, and handheld remote controls.
- Keepass safe – A password manager which helps you to manage your passwords in a secure way. You can put all your passwords in one database, which is locked with one master key or a key-disk.
- Clipomatic – A clipboard cache program that remembers what was copied to the clipboard and allows you to retrieve it, even after you’ve copied something else to the clipboard.
- Firefox – Firefox includes tons of useful features such as tabbed browsing, built-in and customizable search bars, a built-in RSS reader and a huge library of extensions developed by thousand of developers.
- Opera – Opera introduces Speed Dial which vastly improves navigation to your favorite sites. In addition, there’s Fraud protection, an anti-phishing detection keeps browsing safe and secure.
- Crazy browser – A browser that allows users to collect tabs into groups and then load an entire group at once. This feature is very useful for research, as you can summon a set of related sites as needed, without manually opening each one.
- Banshee Screamer Alarm – A snoozeable alarm clock designed to wake you up. Play MP3s, execute programs, or shut down your computer at the time you set.
- BZFlag – An online multiplayer cross-platform open source 3D tank battle game. It runs on Irix, Linux, BSD, Windows, Mac OS X, and many other platforms. It’s one of the most popular games ever on Silicon Graphics machines.
- ConWare IconArt – An easy-to-use icon & cursor editor that allows your to design your own, edit previous icons, create cursors, capture icons from programs and DLL files or import an image for your icon.
- Google Earth – Google Earth combines the power of Google Search with satellite imagery, maps, terrain and 3D buildings to put the world’s geographic information at your fingertips.
- Tux Racer – Getting bored and sick of the Windows game? Tux Racer lets you take on the role of Tux the Linux Penguin as he races down steep, snow-covered mountains. Enter cups and compete to win the title!
- ZSNES – A Nintendo emulator on your desktop. ZSNES is built to run on Windows, DOS, Linux and FreeBSD Unix and it is by far the best SNES emulator available.
- Cartes du Ciel – A sky map that allows you to find out what constellations and planets are visible tonight.
- GIMP – A complete image editing software with capabilities not found in any other free software product. It can be used as a simple paint program, an expert-quality photo-retouching program, a mass production image renderer, or an image-format converter.
- Paint.net – A free image and photo editing software that features an intuitive and innovative user interface with support for layers, unlimited undo, special effects, and a wide variety of useful and powerful tools.
- Google sketchup – A powerful yet easy-to-learn 3D software tool that combines a simple, yet robust tool-set with an intelligent drawing system that streamlines and simplifies 3D design.
- IrfanView – A fast and compact image viewer/converter that is simple for beginners and powerful for professionals.
- Audacity – A complete recording and sound editing software that is available for Mac OS X, MicrosoftWindows, GNU/Linux, and other operating systems.
- Media Monkey – A music manager and jukebox for serious music collectors and iPod users. It offers an intelligent tag editor which looks up missing Album Art and track information via Freedb and the Web.
- CDex – An application that records audio tracks from CDs and saves them to a disk as regular WAV files or as encoded sound files.
- iTunes – One of the highest downloaded digital-jukebox software. Comes with the iTunes Music Store that offers music at 99-cents-per-song.
- Winamp – A multimedia player that supports numerous audio and video formats. It also plays streamed video and audio content, both live and recorded, authored worldwide.
- VLC – A highly portable multimedia player for various audio and video formats (MPEG-1, MPEG-2, MPEG-4, DivX, mp3, ogg, …) as well as DVDs, VCDs, and various streaming protocols.
- QuickTime Alternative – This application let you play QuickTime or Real videos without Apple or Real’s bloated, in-your-face proprietary players.
- PrimoPDF – A free tool for high-quality PDF creation, comprising a user-friendly interface that enables printing to PDF from virtually any Windows application.
- PDF creator – A simple PDF creation tool for those who just want to skip the technical steps and produce a PDF file. If you know how to print, then you know how to use this software.
- doPDF – Using doPDF, you can create searchable PDF files from virtually any application. You can search for text within the created PDF file, and search engines will also index the text from the PDF.
- VMware Server – VMware Server installs on any existing server hardware and partitions a physical server into multiple virtual machines by abstracting processor, memory, storage and networking resources, giving you greater hardware utilization and flexibility.
- LogMeIn Hamachi – A VPN that allows you to access your home PC from work (or vice versa) as though you’re sitting right in front of it.
- OpenVPN – OpenVPN is a tried and true VPN solution. It is totally secure and infinitely configurable. You can install and run this software without relying on a third party.
- Windows Live messenger – The next generation MSN Messenger. It comes with everything that were already available in Messenger, and a new i’m Initiative that makes helping your favorite charity as easy as sending an instant message.
- Pidgin – A multi-protocol Instant Messaging client that allows you to use all of your IM accounts at once. Pidgin can work with: AIM, Bonjour, Gadu-Gadu, Google Talk, ICQ, IRC, MSN, Yahoo!, MySpaceIM and many more.
- Trillian – A fully featured, stand-alone, skinnable chat client that supports AIM, ICQ, MSN, Yahoo Messenger, and IRC.
- Skype – A software that enables you to make free calls anywhere in the world.
- Download Accelerator Plus – A download manager that can enhance your download experience. Features include a search tab, security check for every site and application you download, more speed per connection, resume broken download and preview file when you download.
- Internet download manager – A tool for increasing download speeds by up to 5 times, and for resuming, scheduling, and organizing downloads. The program will resume unfinished downloads due to network problems, or unexpected power outages.
- Getright – As a download manager, GetRight supports BitTorrent downloads too. In addition, you can use GetRight to schedule your downloads for later; it can dial your modem (if needed), download the files you want, then hang up or even shut down your computer when it is done.
- DownThemAll – A powerful yet easy-to-use Mozilla Firefox extension that adds new advanced download capabilities to your browser.
- Flashgot – A Firefox extension that allows you to handle single and massive downloads using the external download managers of your choice.
- Eraser – An advanced security tool for Windows that allows you to completely remove sensitive data from your hard drive by overwriting it several times with carefully selected patterns.
- Restoration – An easy to use and straight forward tool to undelete files that were removed from the recycle bin or directly deleted from within Windows (we were able to recover photos from a Flash card that had been formatted).
- Azureus – A popular torrent manager that allows you to install plug-in and tweak your own settings.
- µTorrent – A very, very tiny BitTorrent client that packs enough features into that small package to compete with beefier applications like Azureus.
- Bitcomet – A bit torrent manager that allows videos files to be previewed while they’re still being downloaded, and there’s a built-in chat tool that lets users chat with other peers in the swarm.
- Cobian Backup – A multi-threaded program that can be used to schedule and backup your files and directories from their original location to other directories/drives in the same computer or other computer in your network.
- Back4Win – A backup program that uses industry standard ZIP compression to ensures that your data will be accessible regardless of which PC operating system. Does not have 4Gb and 65535 file limit of other ZIP backup programs.
- DriveImage XML – This software allows you to backup logical drives and partitions to image files, browse these images, view and extract files, restore these images to the same or a different drive and copy directly from drive to drive.
- JaBackup – JaBackup allows advanced automation features. You can schedule backup tasks by the second or minute, or on a hourly, daily, weekly, or monthly basis.
- Xdrive Desktop – Xdrive gives you 5GB of online storage space to store and backup your files. The Xdrive desktop software allows you to backup and synchronize your data with the web server with few mouseclicks.
- Gmail Space – Use your Gmail account as storage by uploading and downloading files through a browser-based interface.
- 7-zip – This software compresses files in new 7z format with LZMA compression. It supports multi formats, including 7z, ZIP, GZIP, BZIP2 and TAR, RAR, CAB, ISO, ARJ, LZH, CHM, Z, CPIO, RPM, DEB and NSIS.
- Winzip – Using WinZip, you can quickly and easily compress and decompress files, folders, and entire folder trees to save storage space and reduce e-mail-transmission time, as well as encrypt and decrypt your sensitive documents.
- AutoUnpack – This is designed to unpack your compressed file in a single quick step. You merely point to a folder containing your ZIP or RAR files and choose an output directory. Press one button to start a process that ends with your archive perfectly unpacked, or let the program automatically unpack that directory every set number of minutes.
- ExtractNow – A simple program allows you to extract more than one archived file at a time, with one click of a button, making extracting files quicker and easier.
- CCleaner – A system optimization and privacy tool that removes unused files from your system and allowing Windows to run faster and freeing up valuable hard disk space.
- Security Process Explorer – An enhanced task manager, that provides advanced information about programs and processes running on the computer. It displays all the standard information, including file name, directory path, description, CPU usage etc. as well as a unique security risk rating.
- CPU-Z – This mini software allows you to find out everything about your computer. You can find information such as processor name and vendor, core stepping and process, processor package, internal and external clocks, clock multiplier, partial overclock detection, and processor features including supported instructions sets.
- EULAlyzer – This takes your EULA agreement and analyze it in seconds, and provide a detailed listing of potentially interesting words and phrases. Discover if the software you’re about to install displays pop-up ads, transmits personally identifiable information, uses unique identifiers to track you, or more. It is great for picking out privacy issues.
- Process Explorer – An advanced process management utility that picks up where Task Manager leaves off. It will show you detailed information about a process including its icon, command-line, full image path, memory statistics, user account, security attributes, and more.
- Auslogics Disk Defrag – This software was designed to remedy system sluggishness and crashes caused by disk fragmentation. It is fast, simple to easy and what’s more, it is effective.
- SmartDefrag – SmartDefrag boasts a system checker that continually defrags the files that you use the most, and does it without becoming a persistent drag on your system resources. The “Install It and Forget It” feature works automatically and quietly in the background on your computer and it only eats up 14MB ofRAM, so it’s possible to run it smoothly on older machines.
- Local Cooling – Fight global warming from your desktop! Local Cooling automatically optimizes your PC’s power consumption by using a more effective power save mode.
- Belarc Advisor – Belarc Advisor builds a detailed profile of your installed software and hardware and analyzes elements such as whether antivirus software is up to date, or whether all the security flaws in Windows have been patched.
- Thundrebird – Thunderbird makes e-mailing safer, faster, and easier than ever before with the industry’s best implementations of features, such as intelligent spam filters, a built-in RSS reader, and quick search.
- Eudora – A robust e-mail client whose features include multiple address-book-formatting options and the ability to filter, redirect, and forward mail. It supports QuickTime- and HTML-enriched e-mail, letting you include stylized, formatted text and in-line graphics in your messages.
- Opera Mail – Opera Mail is integrated with the Opera browser, and lets you send, receive, sort and search your e-mails quicker and easier than with conventional e-mail programs.
- Sylpheed – A surprisingly versatile email client. ‘Surprisingly’ because it has a friendly, easy to use interface to its many useful features.
- PopTray – The premier pop-up mail checker for standard POP3 and IMAP mail accounts, including Gmail, and it can be coaxed to work with HTML-only mail such as Hotmail by following the instructions at the PopTray site.
- Google Picasa – A free software that helps you locate and organize all the photos on your computer, edit and add effects to your photos with a few simple clicks and share your photos with others through email, prints and on the web.
- Xnview – A fast multi-format graphics browser, viewer, and converter. It has an Explorer-like browser that allows quick and simple browsing of directory contents.
- FxFoto – This software provides a single tool for automatically organizing, enhancing, annotating, e-mailing, printing, uploading, and archiving your digital photos.
- Adobe Photoshop Album Starter Edition 3.0 – This software makes it easy to find, fix, and share your digital photos. Instantly fix photo flaws in just a click or two.
- Jalbum – A gallery software that makes web albums from your digital images.
- Free FLV Converter – This free software let you search youTube and dailyMotion videos without opening your browser and you can even watch the videos using the built-in video player.
- Free Video To iPhone Converter – Convert video files to Apple iPhone MP4 video format. Convert the whole movie or select a partition from the movie to convert (trim video).
- Any Video Converter – An all-in-one video converting freeware with easy-to-use graphical interface, fast converting speed, and excellent video quality.
- iPod Video Converter – Free iPod Video Converter provides an easy and completed way to convert all popular video formats to iPod video.
- Filezilla – A full-featured FTP client that supports Secure FTP, SSL, and other protocols in a slick interface, complete with a tree-structured site manager that lets you store settings for multiple sites.
- SmartFTP – An FTP client which allows you to transfer files between your local computer and a server on the Internet. SmartFTP offers secure, reliable and efficient transfers that make it a powerful tool.
- FireFTP – FireFTP turns your browser into an FTP client, with a two-pane file manager for uploading and downloading.
- Yahoo Widget – A small, specific applications that you can run on your Windows or Mac OS desktop. You can download tons of useful widget from the widget gallery.
5) How To Install Windows XP Operating System ?
Windows XP is one of Microsoft’s most popular operating systems, and though it’s starting to show its age, many people still use it exclusively. Whether you’ve got an old computer that you want to get functioning again or you want to install XP on your new machine, it will only take a short while.
Note: Microsoft is no longer supporting Windows XP, which means it will no longer receive essential security fixes. It is highly recommended that you consider upgrading to a newer version of Windows, such as Windows 7 or Windows 8.
Part 1 of 3: Setup
Part 2 of 3: Installation
Part 3 of 3: Completion
Note: Microsoft is no longer supporting Windows XP, which means it will no longer receive essential security fixes. It is highly recommended that you consider upgrading to a newer version of Windows, such as Windows 7 or Windows 8.
Part 1 of 3: Setup
1- Minimum System Requirements
- 300 MHz Intel or AMD CPU
- 128 megabytes (MB) of system RAM
- 1.5 gigabytes (GB) of available drive space
- Super VGA (800x600) or higher display adapter
- CD or DVD-ROM
- Keyboard and mouse, or other pointing devices
- Network Interface Adapter required for Internet and Network Connectivity
- Sound card and speakers or headphones
2
Find your Windows XP Product Key. It is printed on a sticker on your software package or located on the computer itself. It is a string of 5 groups of characters (each 5 long), separated by dashes, resulting in 25 characters in all. You need the product key to complete installing Windows.- Minimum System Requirements
3
Set your computer to boot from CD/DVD. Before inserting the CD, you'll need to set your computer to boot from a CD instead of from the hard drive. This will allow you to load the Windows XP setup files before your computer boots to its installed operating system. You can change the boot order from the BOOT menu in your BIOS.- To enter the BIOS of your computer, you usually press F9 or DEL when your computer starts or notifies you that you can enter "setup". Click the green "BIOS" link for more information. [1]
- In the BOOT menu, set the order so that your CD/DVD-ROM drive is set as the 1st Boot Device.
- If you are installing Windows XP from a USB drive, make sure that the USB drive is set as the 1st Boot Device. You may need to have the USB drive inserted for it to appear as an option.
Part 2 of 3: Installation
1
Load the installer. Once your Boot Order is set, insert the Windows XP CD into your drive and Save and Exit from the BIOS. Your computer will reboot and you will be presented with the message: Press any key to boot from CD. Press any key on your keyboard to start the Setup program.- Setup will load files necessary to begin the installation, which may take a few moments. Once the loading is complete, you will be taken to the Welcome screen.
2
Press ENTER to begin installation. Once the loading is complete, you will be taken to the Welcome screen. You are given several options, but if you are installing or reinstalling Windows XP, you’ll want to press ENTER to start the installation configuration.
3
Read the License Agreement. This document tells you what you can and can’t do with Windows, and your rights as the consumer. After reading, press F8 indicating you agree to the terms.
4
Select the partition you want to install on. You will see a list of available partitions on your installed hard drives. If you are installing Windows XP on a new hard drive, you should see only one entry labeled "Unpartitioned space." If you have a previous version of Windows or Linux installed on your computer, you will potentially have multiple partitions.- Installing Windows XP will erase all of the data on the partition that you choose. Select a partition that is empty or that contains data that you do not care to lose.
- You can delete your partitions with the “D” key. This will return them to “Unpartitioned space”. Any data on the partition will be lost when it is deleted.
5
Create a new partition. Select the Unpartitioned space and press “C”. This will open a new screen where you can set the partition’s size from the available space. Enter the size in megabytes (MB) for the new partition and then press ENTER.- By default, the partition will be set to the maximum amount of available space. Unless you plan on creating multiple partitions, you can usually leave this at its default.
- Windows XP requires at least 1.5 gigabytes (1536 MB) for its installation files, but you will want more than this for programs, documents, downloads, and other files. 5 gigabytes (5120 MB) is a good baseline amount for Windows XP, with more if you plan on installing a lot of programs.
- You can create multiple partitions on a single drive. This can allow you to separate your programs from your movies and music, or to install another operating system. Windows XP can only be installed on one discrete partition.
6
Select your new partition. Once you’ve created your installation partition, you will be returned to the partition selection screen. Select your new partition, usually labeled "C: Partition 1 [Raw]" and press ENTER.
7
Select "Format the Partition using the NTFS File System" and press ENTER.NTFS is the preferred method, supporting a larger amount of disk space per partition than FAT, and including security features at the file system level. NTFS also includes system level compression. There are almost no situations anymore where choosing FAT would be preferable.- If your partition size is larger than 32 GB, you will not be given the option to choose FAT.
- It is highly recommended to avoid Quick Format, as this skips an important process that checks the hard drive for errors or bad sectors. This scan is what consumes the majority of the time taken when performing a full format. If there are errors on a disk at the physical level, it's best to catch them now rather than later.
8
Wait for the format to complete. The system will now format the partition. The length of time this process requires depends on the speed and size of the drive. In general, the larger the partition, the longer the process will take.
9
Wait for the Setup files to copy. Windows will now start copying files from the installation disc and prompt you to reboot the computer when the process is completed. Press ENTER when prompted to reboot, otherwise it will do so automatically after 15 seconds.
10
Allow the computer to boot normally. You will see the message asking you to press a key to boot from CD. Ignore it and allow the computer to continue booting from the hard drive. You will see the Windows logo as the Setup program loads.
11
Wait for the installation to proceed. After the Windows logo goes away, you will see a list of steps remaining on the left side of the screen, and tips for using windows on the right. The time remaining for the installation will be displayed below the list of steps remaining.- It is normal for the screen to flicker, turn on and off, or resize during this process.
12
Choose your language and region settings. During the installation process a dialog window will appear, asking you to choose your Regional settings. Select appropriate settings native to your area. Click the Next button when that is completed.- Enter your full name if you want. This will be set as the “owner” of Windows, and will be attached to certain things, such as Document creation.
13
Enter your Product Key. You will not be able to complete the installation process without a valid Product Key. Click "Next" to continue.- Some versions of Windows will not ask for the Product Key until installation is complete.
14
Set your computer’s name. This will be the name that represents the computer on a network. Windows sets a default name, but you can change it if you would like. You can also set a password for the Administrator account. This is optional, but recommended for public computers.
15
Select your time zone. Ensure that the date/time are correct. Click "Next" to continue.
16
Choose your network settings. Almost all users installing Windows XP on a home or personal computer can leave "Typical Settings" selected for Network Setup. If you are installing Windows XP in a corporate or academic environment, check with the system administrator, though Typical Settings will most likely work.- In the next window, nearly all users can select “No, this computer is not on a network, or is on a network without a domain.” If you are in a corporate setting, ask your system administrator which you should choose.
- You can typically leave the workgroup name set to default.
17
Wait for the installation to finalize. This will only take a few minutes, and the computer will reboot when it is finished installing. Once the computer reboots, you will be taken to the Windows XP desktop. At this point, installation is complete, though there are a few things left to do before Windows is completely usable..
Part 3 of 3: Completion
1
Set your display preferences. Once Windows loads, you will be told that Windows will automatically configure your display. Click OK to start the configuration. Your screen will flash a couple times, and then you will be asked if you can read the box that appears.
2
Set your connection preferences. If your computer is connected to the internet, select your connection type. Press Next to continue.
3
Activate your copy of Windows. If connected to the Internet, Select "Activate Now." Windows will connect to the activation server and automatically authenticate your copy of Windows. If you haven’t entered your Product Key yet, you will need to enter it now.[2]
4
Create Users. After the Activation Process, a window will appear allowing you to select the users for the computer. Enter your name, and the names of others who will be using the machine. Press Next to continue.
5
Start using Windows. You will now be looking at the default Windows XP Desktop. Congratulations! There are a few things that you should probably do now that you have Windows up and running:- Install any drivers that you need to for your computer’s hardware.
- Install an antivirus program if you are connected to the internet.
- Set your BIOS to boot from the hard drive again instead of the CD.
5) How To Install Windows 7 Operating System ?
When you make the decision to upgrade your current OS to Windows 7, there are a couple of ways to go about it. The most hassle free is a complete clean installation. This method will save you lots of headaches down the road. Follow this guide to help make your transition to Windows 7 as smooth as possible.
Part 1 of 3: Changing your OS to Windows 7
Part 2 of 3: Installing Windows 7
Part 3 of 3: After Installing
Part 1 of 3: Changing your OS to Windows 7
1
Check your specs. In order to run Windows 7 you must have at least a 1 gigahertz (GHz) processor, 1 gigabyte (GB) of RAM (2 if installing 64-bit), 16 GB of hard disk space (20 if installing 64-bit), and a DirectX 9 graphics card with WDDM 1.0.[1] Different programs will have different system requirements.- To check your system specs in Windows Vista, open the Start menu and right-click Computer. From the menu, select Properties. The screen that opens will provide you with your computer’s specifications.
- To check your system specs in Windows XP, open the Start menu and right-click My Computer. From the menu, select Properties. This will open the System Properties window. In the General tab, your system specifications will be listed under the Computer heading.
Ad
2
Backup your data. If you are upgrading from another OS, you will lose all of your files and programs. The programs can’t be backed up; they will need to be reinstalled. Any files—including documents, music, pictures, and videos—that you want to save need to be copied to a backup location.- You can use DVDs, CDs, external hard drives, flash drives, or the cloud, depending on how much data you have to backup.
3
Set your BIOS to boot from CD. To do this, restart the computer and enter the setup screen when the manufacturer logo appears. The key to do this will be displayed, and varies by manufacturer. The most common keys are F2, F10, F12, and Del.- Once in the BIOS menu, select the Boot menu. Change the order of devices so that your computer boots from CD before booting from the hard drive. Save your changes and exit. Your computer will restart.
- If you are installing from a flash drive, then you will need to set the BIOS to boot from removable storage.
Part 2 of 3: Installing Windows 7
1
Begin Setup. If the CD has been inserted and the BIOS is set correctly, you will see a message telling you to “Press any key to boot from CD…” Press a key on the keyboard and the setup process for Windows 7 will launch.- Your system may automatically launch the setup program without asking you to press any key.
2
Watch the Windows files load. After completion, the Windows 7 logo will appear. No files have been altered on your computer yet. Your data will be deleted in later steps.
3
Choose your preferences. You will be prompted to confirm your Language, Time & Currency format, and Keyboard or input method. Select the appropriate options for you and click Next.
4
Click Install Now. Do not click repair computer, even if you are repairing a computer by reinstalling Windows. Once clicked, Setup will begin loading the files it needs to continue.
5
Read and accept the terms. In order to advance, you must indicate that you have read and agree to Microsoft’s terms of use. Be sure to read through it so that you know your rights and limitations as a user.
6
Choose Custom install. This will allow you to perform a clean installation. Even if you are upgrading a previous version of Windows, it is highly recommended that you perform a clean install. Performing an Upgrade will often lead to devices and programs not operating efficiently and effectively.
7
Delete the partition. A window will open asking where you would like to install Windows. In order to perform a clean install, you need to delete the old partition and start with a clean slate. Click “Drive options (advanced).” This will give you the ability to delete and create partitions.- Select the partition of your existing operating system and click the Delete button.
- If you are installing an operating system for the first time on this hard drive, then there will be no partitions to delete.
- If your hard drive has multiple partitions, be sure to delete the correct one. Any data on a deleted partition is lost for good.
- Confirm the deletion process.
8
Select the Unallocated Space and click Next. There is no need to create a partition before you install Windows 7, this is done automatically.
9
Wait while Windows installs files. The percentage next to Expanding Windows files will steadily increase. This part of the process can take up to 30 minutes.- Windows will automatically restart your computer when finished.
- Setup will launch again, and a message will tell you that Setup is updating registry settings.
- Setup will then configure your computer’s services. This happens every time you start Windows, but will happen in the background next time.
- A window will open letting you know that Windows is completing the installation. Your computer will restart again when this is complete.
- Setup will now load drivers and check video settings. This part does not require any input from you.
10
Enter your user name and computer name. Your username will be used to log in to the computer and personalize your account. Your computer name is the name that your computer will display on the network.- You can add more users later through the Windows 7 control panel.
- Windows will ask you for a password. This is optional but highly recommended, especially if the computer will be accessible by users other than yourself. If you’d rather not have a password, leave the fields blank and click Next.
11
Enter your product key. This is the 25-character key that came with your copy of Windows. Check the “Automatically activate Windows when I’m online” to have Windows automatically verify your key the next time it is connected to the internet.
12
Select your Windows Update option. To make sure that your copy of Windows runs securely and stably, it is highly recommended that you choose one of the first two options. The first option will install all updates automatically, the second option will prompt you when important updates are available.
13
Select your date and time. These should be correct already as they are linked to your BIOS, but you can change them now if they are not. Check the box if your area observes Daylight Savings.
14
Select network preferences. If your computer is connected to a network, you will be given an option to identify that network. Most users will select Home or Work network. If your computer is being used in a public place, select Public network. Mobile broadband users should always select Public network.- Windows will now attempt to connect your computer to the network. This process is completely automated.
15
Explore your desktop. After one final loading screen, your new Windows 7 desktop will appear. Installation is now complete.
Part 3 of 3: After Installing
1
Run Windows Update. If you selected not to update automatically, you should run Windows Update as soon as possible. This will ensure that you have the latest security and stability fixes. If you chose to automatically update, your computer will start downloading and installing updates as soon as it is connected to the internet.
2
Check you devices and drivers. Windows 7 should install most if not all of your devices automatically. Some older devices may not be initially supported, however. You will need to find the correct drivers from the device’s manufacturer’s website.
3
Reinstall your programs. Because you did a clean install, none of your old program will be available. You will need to reinstall everything you want to use again. This includes word processors, web browsers, games, and more.- Not all old programs are compatible with Windows 7. Check for updates from the program’s manufacturer, or take a look at our guide on running old programs in Compatibility Mode.
Edit step
4
Be sure to install a good antivirus program. This is especially important if your computer is connected to an always-online internet connection
